Sunday, 20 July 2014

80's throwback- Soft toy in a car window

When I was a kid I loved Garfield.  I liked lasagne, and so does Garfield.  I wasn't any more thrilled with Mondays then than I am now and while I didn't have a coffee habit when I was a kid, I love my coffee now.  For a while in the 80's having a Garfield in the back window was a popular thing- similar to those nodding dog figures that were a thing for a while or fluffy dice handing of the rear vision mirror.  I always wanted a Garfield in the car as a kid so when I got my first car (1979 Toyota Corona) my sister gave me one for my birthday.

Aside from fulfilling that childhood wish, Garfield has also been brilliant to identify my car in a carpark.  Particularly since Garfield is much rarer to see these days!

This was particularly useful as for my first and second cars, my key could open the door of any similar make and aged car (and vice versa!).  This caught me once on the way home from university when I hopped into my car and noticed that my stuff inside wasn't right.  Moments later the lightbulb dinged and I quickly slunk out of the stranger's car that was the same make, model and colour as mine, and walked up the road several meters to get into MY car to get home!

But my Garfield is getting old.  Years in the sun have bleached his orange fur, while the rubber in the suction cups and the thread holding them on both failed.  So Garfield needs a makeover.  Since the method is ridiculously simple and could be used for any soft toy if you were looking for a car identifier, I thought I'd share it.

Equipment

  • A small soft toy (too big and the suction cups may not hold the toy up- not to mention issues blocking a view when driving!)
  • Suction cups- I found a set of 9 with hooks built in, in a local $2 shop in the hardware related section although I sometimes see them with bathroom related stuff
  • Sharpies of assorted colours (optional if your toy is faded)
  • Sewing needle
  • Strong cotton thread
  • Glue or nail polish for knots (optional)
My Garfield fresh from the car after his previous suction cups died.


The first step is only if you have a faded toy you wish to revive for nostalgic reasons.  I wouldn't do this if it is a treasured childhood toy that is still snuggled, but if the toy is going to sit on a shelf or similarly it should be OK.  Basically, it is to give your toy a dye job using Sharpies (or non-brand name permament markers).  Sharpies these days come in all sorts of colours these days so it shouldn't be too hard to come up with the colours you need.  In my case, an orange, yellow and black.  Just run the side over the toy for the large areas or the point if colouring smaller areas.
As you can see, he looks a little blotchy but that's mainly because the camera lighting, plus that will fade a bit over time and even out.

Then sew the suction cups to each limb.  Ensure you use a good amount of thread there as UV light is going to weaken those joins over time.  If you are paranoid about your knots, add a drop of glue or nail polish to each knot.  And that's it!

Not the most exciting tutorial in the world but if you've ever wandered constantly in a carpark looking for a car in a sea of very similar coloured cars it might be worth a go!

Sunday, 13 July 2014

Works in progress or just finished

No tutorial for this post, just a few things I've knocked together at the half way point of my holidays.  Since I was already in the process of working on something for my car, I tried making a rubbish bin to pop in the card using a great tutorial on Crafster.  While the original tutorial included both a inner, removable bag and an outer fabric liner, I elected to just make a single plastic bag with a tag.  It won't be terribly obvious where I keep my bin anyway.

This was a great, cheap project as the material is from my ill fated sashing for the quilt top shown here.  After making the sashing, laying it out next to the quilt my first thought was.... 'yuck, that doesn't work'.  The trick is going to be working out what to do with the rest of it now! The plastic is a recycling job using the plastic from a set of sheets I bought a while ago.  You can also buy it by the meter at Spotlight or similar but don't bother if you only need a bit like I did!  Although this bin won't be water tight, it will be easily cleanable if a few drops leak out of an empty coffee cup or the like and who puts full drinks into the bin in their car anyway?

I've also been working on a crochet bag on and off as it fits nicely in my day to day bag as a travel project.  I'm about 3/4 of the way through the crochet side of things, then I have to work out if I want to try and dye the motifs (I couldn't find cotton that was a colour I liked so the pale blue is not my first choice) and finding the necessary other bits and pieces.  I probably won't finish the crochet before the end of the holidays but I'll see if I get motivated!

Tuesday, 8 July 2014

Status update

Yes it is school holidays again which means I can dust off the project to-do pile and have something to blog about once more!

Although I've been off for a week now, things have been slow on the production front.  However, I did have a lovely time down at the Melbourne Craft Fair at Jeff's Shed (the Melbourne Convention Centre for non-Victorians).  I was relatively restrained but I did leave with two shopping bags full of bits and bobs that I'll get around to gushing about soon.

I have also spent the morning on a long needed project- sorting through my beading stuff and trying to get it into some sort of order.  A task that I had successfully achieved (including condensing things into two large boxes rather than two large boxes and one medium box), put everything away onto the shelf and- d'oh!- discovered a forgotten plastic storage box of misc beads.  Now to see if I can squeeze it in somewhere or if it is back to the drawing board.

I also discovered in the process that I have an awful lot of seed beads that are mostly still in their correct storage compartments.  Anyone who does beading will know the 'joy' of using those oh-so-useful divided plastic boxes only with lids that don't quite form a bead proof division all the way around in at the lid-divider junction.

The upshot is that for the next few weeks I'll have some projects to show either in progress or finished with instructions.  That's the goal, anyway!

Sunday, 4 May 2014

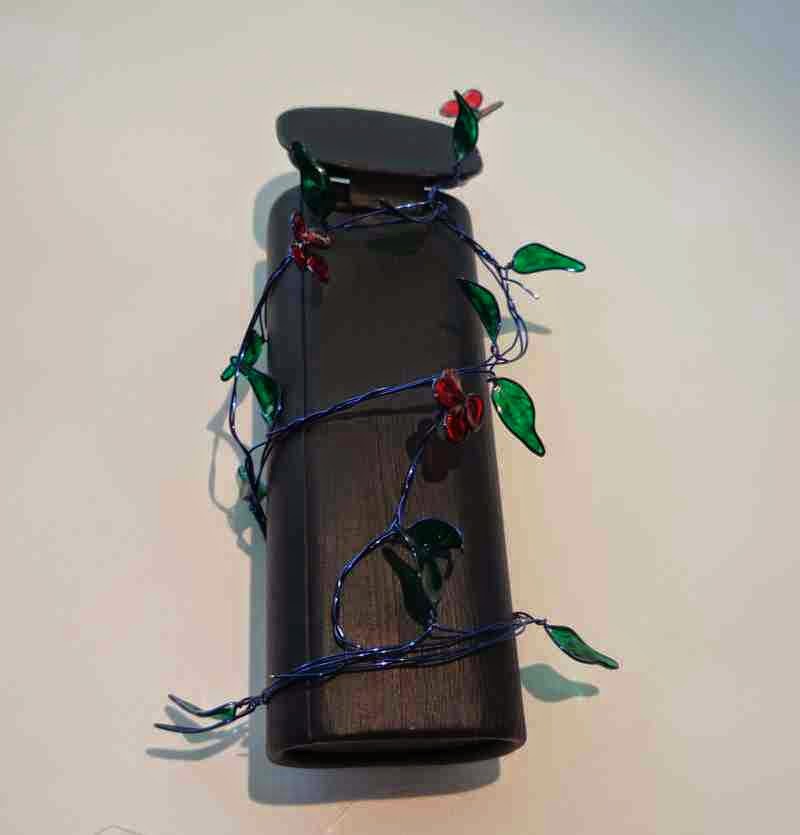
Magnetic pen holder from a mint tin and making wire flower vines

This was a post inspired from the sense of Eclipse mints*.
waste every time I finish a tin of
Browsing Pinterest and other sites I've often seen very cool things people have done with Altoid tins.  However, Altoids (or their tins) are not available here (and I get the impression that the mints are really strong which is not my preference anyway).

Sadly the design of an Eclipse mint tin does not easily lend itself to repurposing.  The opening is on the short end and is small enough that putting in a finger to dig out a mint is a little fiddly.  But pinterest did show me one idea that I've run with- a magnetic pen holder to pop on the fridge.
My finished pen holder doing it's job on the fridge- hence the weird reflections


Making it is fairly easy.  Step one was to roughly sand the surfaces so the paint will stick to it.

Then using acrylic paint, paint it with your base coat.  You may need to do several coats to cover all the original printing.  Also, the front of the tin has the name embossed- I used the other side on my finished tin, or you will have to think about a creative way to hide this.

At this point, the design possibilities are endless.  You could paint it, stick stuff on it, anything really.  Or just glue some magnets to the back and call it good.  I have gone with a creeping vine that I made in the previous post so below is my very simple idea for joining it on.

Basically my secret tool is my hot glue gun.  It works well for fast fixes and the join is strong enough to hold the wire to the painted tin.

Secure one end to the tin and fix in place.

Then artistically curve the vine up and secure whenever you like at the back where it will be hidden.

Something that I didn't do because I only thought of it too late, is to make a trellis from paper or card that the vine can be climbing as I think my background colour was too dark to let the flowers and leaves glow suitably.  Next time I finish a tin of mints, perhaps I'll try version 1.2!

One tip though that I unfortunately discovered- hot glue is not strong enough to hold a strong magnet to the tin if your magnets are strong.  When I went to pull my pen holder off the fridge to reposition it, the magnets were left behind.  Ooops.  A bit of E6000 glue later and I hope the problem is solved.
I also added a label to the lid, mainly because that oval shape screamed 'label' to me and I needed to add something.

So there you have it.  Simple but useful and very cheap to make.

*Disclaimer:  I don't even have Adsense turned on on this blog, let alone get sponsored by anyone so this post is not an endorsement to Eclipse mints or any other company*

Sunday, 27 April 2014

Making flower vines

I was going to have this as part of another post but decided this is better as a stand alone tutorial as there are many potential uses for this technique.  The next post will show you how I used the flower vine I made here.

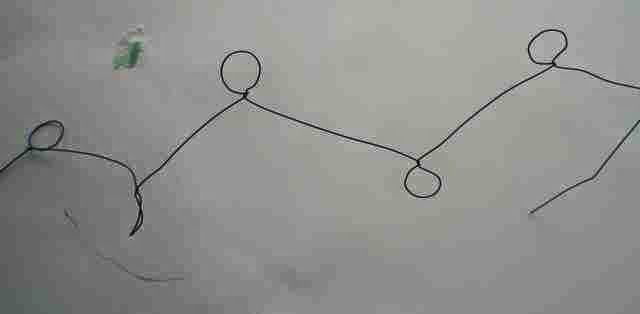
To make the vine, estimate how long you want your vine to be.  The main wire should be about 2.5X this length.  I went with about 50 cm long.  Using something about the right width (a pen or pencil are ideal), create a series of loops roughly evenly spaced along the wire.


Each of these loops will become leaves, so now shape them as you wish.  The easiest way to get a leaf shape is to gently pinch the top.  Of course if you are a botanist, feel free to go and google the species you wish to mimic and shape your leaves accordingly.

Now use your medium of choice to fill in the shapes.  I went with Mod Podge Dimension Magic but in this post I investigate several different materials you can use.

Let this dry and (if you used a transparent filler as I did) use a permament to colour in the leaves.  The layer may be very thin- be careful not to make holes, but if you do (or if you feel it is too thin anyway), add another layer of medium.


Flowers are made in a similar way to leaves.  It is best to make each flower from a separate piece of wire (about 20 cm is a good length).  I used a slightly smaller diameter stick to make four loops very close to each other for the petals and sometimes also added a leaf or two to the remaining length


Now to put it all together.  Take the main length of leaves and double them over.  Start at the bottom and gently twist them together.  At intervals, add the flower wires and incorporate them into the main stem as you twist.

Continue the length of the main wire.

You can trim any stray bits of wire if you wish.  You may also want to wrap florist tape around the 'stem' to hide the wires and make it a bit more natural looking.  This is also a good idea if you plan on using this length of wire as jewellery or a hair decoration as those little ends of wire may try to poke the wearer otherwise!

I love the transparent effect you get using permanent markers.  The depth of colour can be increased by using multiple layers of your clear filling material (a good idea for strength anyway) and colouring each layer as you go.  Or get fancy with a fine tipped pen for further detail, similar to the painting on stained glass windows in old churches.


Somewhere in the distant future I plan on playing with this more to make some jewellery but if you beat me to the punch, I'd love to see!  Leave a comment or shoot me an email.