Wednesday, 1 July 2015

Quick and simple earring holder

Yes, it's school holidays again which means I get to see what my house looks like during the day and can pull out the old projects that have been sitting abandoned and alone for months.

Today's project to get me back in to the mood is more practical than pretty although you can glam it up as much as you like.  It's for a earring holder for hanging earrings.  Something I needed as the holder that I had was pretty enough but only really useful for 5 pairs at most.

Picture frame style earring holder


I'll be the first to admit that this is not an original idea (I first found it on Pinterest so who knows where the original came from!)  But I do like the idea it's simple enough that I spent less than $5 on the whole project and most of that came from buying the frame I used from the Salvo's Op Shop.


Materials


  • A picture frame
  • Pretty paper-  OK, I went with black as I wanted the jewellery to be easy to see but you can go as wild as you like
  • String or wire or chain with bigish loops- I used a discontinued product called DMC Desire, it's a wire wrapped with cotton thread

Method

Here is my frame with a pretty but boring and yellowing picture from the op shop.  But who cares, I'm not keeping it anyway.  Oh but do check that it's easy to remove the picture or have patience if you bought a frame with the image stapled in...


 ...like I did *sigh*

Oh well, a bit of leverage with a screwdriver got those staples out and I cut a piece of black paper to fit the frame (hey it could be art- go listen to Martin Pearson's 'The Black Painting Song') or use pretty paper if you prefer!


  Now, assuming that your frame either had glass or backing card, place the paper over the glass and start attaching your lengths of wire.  Just tape should be fine unless your earrings can double for fishing weights.  Do keep in mind how long your earrings are with your spacing.

Then pop it into your frame and you are done.  Ridiculously simple but it holds a lot of earrings in a way that lets you quickly look for and get any pair that you like.  In fact, I think I could get a few more pairs now...

Wednesday, 1 April 2015

Final touches

Nullus Anxietas is only a bit over a week away and I need to start getting myself packed.  I did want to make one last little thing for my costume that had been kicking around in the back of my mind for a while- my own dis-organiser.  I had found a cute little empty locket at Spotlight and thought it would make a great start.  Only problem was, it was tiny!  The cutting board I use has 1 cm lines marked, so you can see this is NOT a large space to work with.

My first attempt was less than successful. With the note on it, you couldn't see the interior.  On the other hand, that was a good thing since the interior was rubbish.

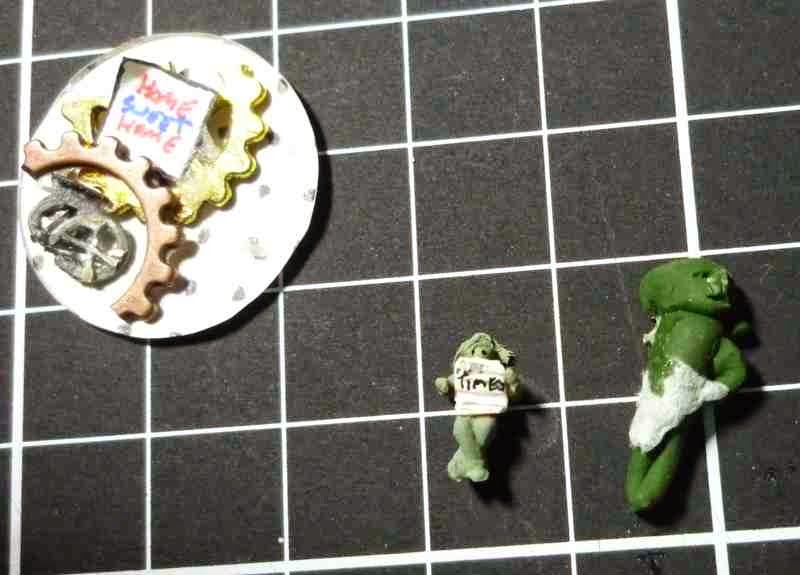
My imp (fimo) was way too big, as were the gears and the DIY bicycle the imp was meant to ride to power the clockwork was way too small.

So it was onto plan B.  Step one of which was to get my hands on some model railway figures (N gauge or 1:160 scale).
A bit of paint on a seated man reading a paper, a finetip marker to make it the AM Times and some scrap paper to make large ears and I had an imp.
New imp next to the old one and the old background in the top left
Next was to make a home for him.  The easiest way to to that with this scale was to use the printer.  A few google searches for suitable images and I had a gear background (actually the image of a old pocketwatch workings), and a room.

The window is from a model railway kit.  I was going to put some white paper or hints of another room on the other side but when I saw what it looked like with the gears, I left it as is.

A bit of very thin wood cut to size made a floor, aged up with a drop of woodstain after drawing floorboards with a fineliner.

The chair is hijacked from a 1:144 scale house that is a work in progress on long term hiatus and the corkboard and clock are another google image result, shrunk down to size and printed before being cut out and stuck down.

Finally, to add a bit of extra colour, I made a mini pot plant for the imp out of a seed bead, a scrap of green landscape foliage for railways, dotted with red paint for flowers.

And here is the result!

The note is now on the inside lid as now I want people to see the interior!  If anyone reading this is coming to the convention, come find me- I'd love to show it in person.

Friday, 6 March 2015

We have swamp dragons!

It's done!  The head only nods, it doesn't turn like I wanted but he's done, stuffed and ready.  I'll probably use a bit of hidden velcro or tape or similar to hold him in place when walking around but I'm resonably pleased.  I won't be posting a full tutorial down the track as a lot involved making it up as I went and fixing the odd bit that went a bit funny, but if you do know a little about sewing and toymaking, I should be posting enough to let you make your own version. That won't be for at least a month so stay tuned!


Sunday, 1 March 2015

Four weeks to go... uh oh...

ARRRGGGHHH!  Only four weeks to go before the convention, and my weekends are already too busy (glances guiltily at the unmarked SACs in the corner).  But I really want to finish my dragon (not to mention make the rest of the costume!) so I got stuck in this weekend to try and finish him off.

Here's the side view- as you can tell, I've not put the front legs on yet!
Front legs are on and you can see he has ears and a face
I think I'm on the home stretch now, I just need to make some ears wings (which are basically slightly bigger ears).  He's not got the range of movement that I really wanted (while he can nod well, it's very hard to get him to turn his head side to side).

I also tried to make a 'leather' apron for Lady Sybil to wear but.. well the less said, the better right now. I've not experienced the joy of sewing vinyl in a machine before and while I tried a few tricks, they are not helping right now.  I'm leaning towards ignoring seam details and just hand sew the string/ neck band on and calling it good enough.  And I have no idea about the rest of the costume, too little time, no great ideas.  ARRRGGHH!

Oh, and I've been told that some people (hi Mum!) are having issues with commenting.  Sorry- I've tried playing with the settings available to see if that helps but I would rather not have it anonymous as I end up playing spam filter to poorly worded advertising posts.

Sunday, 8 February 2015

Making a swamp dragon- Post 1 of ?

Urgh, the 40C weather has come and I don't like it!  It's also a scarily short period of time before the Australian Discworld Convention- at least if you have not yet done any thing for your costume *eep!*

So I have spent some time today starting my very own puppet swamp dragon.  Early days so far but here is the head with some features.
Don't mind the bit on the bottom left- that's the gap for me to add stuffing and other things

I'm just working on the ears now as I want to have the head as complete as possible as it needs the most attention to the details.  There will be a pattern of sorts at some point in the distant future but for now I am just going to be recording progress!

Wednesday, 28 January 2015

The end of the holidays (sob!)

As I procrastinate my morning away on my first day back at work, I thought I would post a final update on some finished projects.

First up, I managed to make a tear off calendar of my own in time for January to be of some use!  Here are the pages before assembly.

And in the nick of time and after several days of frustration as the spine guilding wasn't working (turns out that varnishing the fabric before guilding is NOT optional) I managed to put my latest two Discworld stamp yearbooks together.  I even found time to put stamps into the 2014 edition!

Oh, and I also assembled/varnished the cute bookend that you see.  Little tip- don't buy the tubes of acrylic paint from Kmart- I used the ENTIRE tube of white to try and paint it and it was so watery that it still didn't cover it properly.  I had to use another paint to give it the final coat.

Craft is going to be on the backburner for a while but I'll post if I come up with anything that might be useful!

Sunday, 11 January 2015

D'oh!

I had and have big plans for these holidays but the universe seems to be against me right now.  I have managed to scientifically demonstrate that it is safer for me to do craft than it is to do housework.  While washing the dishes a glass decided to shuffle off this mortal coin and one of the bits embedded itself into my right hand.  A trip to hospital, four stitches, a course of antibiotics and a tetanus shot later and week pause in crafting (bending hand in certain directions was Not A Good Idea).  So instead I did what any sane person would do, and went on holidays to NSW- Parkes and Bathurst specifically.

Anyhow, over the Christmas break I stayed with my parents and managed to put this necklace together that had been in the queue for a while:
Celtic Knot necklace- kit bought at a craft fair from Bead Shack

And make the beading on this pretty perfume bottle (sidenote- while there doesn't seem to be anywhere to get this kit online, look on ebay or similar for woodworking supplies for pen, bottle and other bits that beading can be used on)
And my old desk pen holder (an old mug) was starting to look a bit battered so I put this together.

Parkes Telescope: 'The Dish' from the movie The Dish
So as I start to unpack from my trip, enjoy my first day without stitches and nurse a sore back (pulled a muscle just before driving home.  Turns out 7.5 hours driving is not a good thing either... urgh, I need a holiday....)

More to come- some new stamp albums to bind, I need to get my convention costume sorted for the next DW convention and just before I wrecked my hand I had started a new beading project.