Wednesday 29 June 2011

Binding book pages together- single page or folded page method

This method is to bind single pieces of paper or a number of individual folded pieces of paper together.  This method is a variation of the sort of binding used for paperback books and uses glue to hold the pages together along with a piece of fabric for extra strength.

That said, this is not my favourite method for something you want to really last.  Just as pages can fall out of a old paperback book, with wear they can potentially fall out of books made this way and for the same reason- glue can degrade over time and once there isn't enough glue to hold the pages, out they come.  I also have not used this method myself to bind single pages together.  It should work fine, but there may be a greater chance of pages falling out as the glue has less area to grip on for each individual piece of paper.  If you try it yourself, tell me what you think!

What you will need:
Use a thin, light weight fabric slightly shorter than your book's spine and the spine width plus 5cm
  • Your pages to bind.  while it doesn't matter if the edges not to be bound are neat, the edge that takes the glue must be straight
  • Some glue.  I use a acid free pva glue (also known as white glue, carpenters glue, wood glue, school glue depending on where you are from).  Being acid free it is not going to degrade the paper over time.  It also is designed to not yellow, set clear and, most importantly, have a flexible bond.
  • A piece of thin, loose weave fabric.  Thin because we don't want too thick fabric to deal down the track, and with, loose weave as it allows glue to pass through easily.  The fabric should be about a centimeter (half an inch) shorter than the length of your book spine and the width of the spine plus about 5 centimeters (2 inches)
  • Something to clamp your pages in.  Mine is actually a large flower press- two thick pieces of wood with holes drilled in each corner for large bolts to pass through, held in place by wing nuts but you can easily improvise something similar with some scrap timber and some bolts.
All the pages folded, note how the book will be composed of individual folded pages.

If you are going to use folded pages, take your pile of pages and fold them, making sure all your creases are nice and sharp. Also make sure that your pages are in the right order- you don't want to finish making your book only to find out at the end that page 53 comes before 27!

Folded pages, ready to go
You'll probably find if you are using folded pages that you end up with a bit of a bulge when the pages are put in a pile due to the folds.  That's OK- just make sure your creases are as sharp as you can.

Your first step is to put the pages into your book clamp.  It is absolutely vital that your spine is perfectly even.  The easiest way to ensure this, is to have your spine flat.  Then you can use a flat surface to tap your pages.  However, you can use a slight outward bulging curve.  The key though is that the spine is even.  If any of your pages don't make contact with the glue in the spine then there will be nothing to hold them in place.


Book pages clamped in.  Note how little of the pages are exposed.

Clamp the book so the spine sticks out only  about 3 mm (1/16 of an inch).  This keeps the pages from moving.  The pressure also prevents glue from seeping too far into the book, sticking all your pages togther- we just want the book to be glued at the spine!

Another view of the book pages clamped in place
Glue on spine
Take your glue and run a thin line down the length of the spine.  Then use your finger to smear the glue out- you must ensure that all pages get covered by the glue.  Use a bit of pressure to force the glue into every crack and cranny.
Smear the glue into the spine well (sorry for the bad quality- it's hard to take a photo one handed while using glue with the other!)
Leave the glue to dry, then add another coat the same way.  Leave to dry again.

Add more glue the same way, but this time place your piece of fabric, centered on your book.  Run your finger over the fabric to work the glue through the material to ensure it makes good contact.  Leave to dry, then add another coat of glue over the spine with fabric as before.

Leave everything to dry well, then remove the clamp from your pages.  Your pages should be nicely glued together- if you just hold the fabric on each side of the spine and lightly shake, nothing should fall out!  These bound pages (called a text block) are ready to be bound into a cover- stay tuned for the next exciting tutorial installment!

Tuesday 28 June 2011

How to make your own book- Part 1

Welcome to part 1 of an undetermined number of posts that will be dedicated to the art of book binding.  Now I should first note that I am not even remotely an expert in bookbinding.  My method is a mixture of things I have learnt from books, online and techniques I've made up as I've gone along.  I'm sure that there's going to be things that 'proper' book binders don't do or do better than I.  But my method does have the advantage of needing few, if any, specialised equipment since when I first learnt to make books I had no money to buy things and no obvious go-to place to get them from anyway.

But enough of my waffling I hear you say!  Let's get to work!  This first post is dedicated to, perhaps the most important part- the book content.  If you want to make a blank notebook, you may wish to skip this post.  If you are interested in printing your own books, then read on.

This post is inspired by my love of Discworld stamps and my need to have a safe place to store them and information about them.  I collected Discworld stamps for about five years.  While I no longer collect (I hit a patch where I could no longer afford them and didn't have time to study what I had- vital if you are into collecting 'everything'), I still love my current collection and want to give them a home that will let me easily gloat over my pretties as I wish.  I was inspired by Stamp Yearbooks- in Australia (and I believe other countries), each year the Post Office creates yearbooks.  These contain every stamp released throughout that year in a book that also includes articles, history, pictures and information about the stamps. Since there was no such thing in existence for Discworld stamps, I made one (this sentence summarises 1-2 years work per book so far).

But you may not care about stamps.  No problem, everyone has their flaws.  Perhaps you want to publish your own book.  Perhaps you have a favourite you've found on Project Gutenberg that you want to make into a very special edition for a gift.  No worries!  Here's a quick and relatively easy way to make your own book. 

I'm going to assume you have a relatively recent copy of Microsoft Word at this point.  I could do this on my old (XP I think?) version so it doesn't have to be the latest and greatest, but it does have to be Word.  While I am sure there must be other programs out there that can do the same thing I don't know them well enough to write about them- sorry.  I'm also going to be basing this on Australian/UK paper sizing (A4 is 210 mm by 297 mm).  Most of this information will be the same for US folk, just some of your paper dimensions will be a little different.

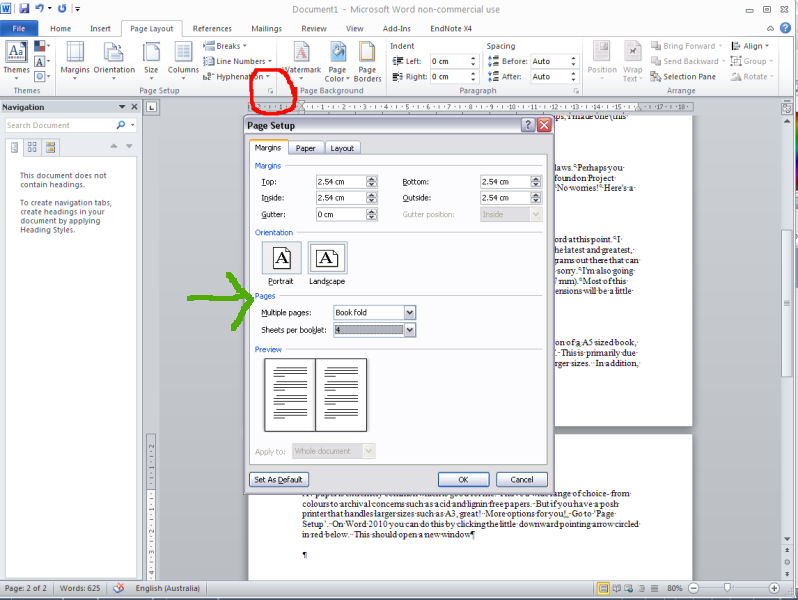
First set up a new document.  I'm going to base all this on the production of a A5 sized book, which means printing on A4 pieces of paper that will be folded in half.  This is primarily due to practicality.  While my printer happily prints A4, it does not print larger sizes.  In addition, A4 paper is extremely common which is good for me.  I have a wide range of choice- from colours to archival concerns such as acid and lignin free papers.  But if you have a posh printer that handles larger sizes such as A3, great!  More options for you!.  Go to ‘Page Setup’.  On Word 2010 you can do this by clicking the little downward pointing arrow circled in red below.  This should open a new window.  Click on the tab labelled ‘Margins’.  Under the subheading ‘Pages’ (green arrow below) click on the dropdown box to select ‘Book fold’.  A new dropdown box will appear below it.  This asks you for the number of pages- I use sixteen, for reasons I’ll get into below.  Click OK when you are done.

What all this does, is tell Word to print your document so that when the pages are folded in half, every four pieces of paper will make a booklet (each piece of paper has four pages- two each side, so 16= four sheets of paper with four pages each), or a section of the book.  If you like you can increase or decrease this number but personally, I find sixteen is the best.  Every time you fold a piece of paper and insert it into another, the edges opposite the fold for the inside pages will stick further and further out due to the thickness of the paper.  While this is not terribly noticeable for four pieces of paper, eight or more will definitely be noticeable.  This means you will need to either trim the final product (very tricky if you don’t have the right tools) or will have uneven pages on that edge.

If you only had four selected under ‘number of pages’ then each piece of paper will be a single section.  At this point there is no point sewing pages together (you would be at it forever with a large book) but if you did this by mistake (like I did with my first copy- thank you Word and your constant setting changes!) then don’t panic, I’ll include a tutorial showing how a method to bind pages together this way.  After all, I may as well use the pages I printed wrong *sigh*

Once this is done, you are ready to go.  You should have noticed that your page size shrank when you hit OK- this is because half an A4 page is A5, so your working page is therefore smaller.  You may choose to play with margins and all the other things Word lets you do.  If your printer does automatic duplex you may need to check if there are limitations on margin size (the printer may need a certain amount of paper blank to have a bit to grip to feed back into it for the other side).  Otherwise, write your masterpiece, compile your information, paste your text or otherwise assemble your book.

Some tips:
* Grab a handy hardcover book to get a feel for pages.  Even pages will always be on the left, odd on the right
* Leave two pages blank at the start so you have a single blank page in your finished book before the title page gives the book a more ‘authentic’ feel.
* Page numbers are useful- don’t forget to add some.  If you don’t want the first few pages (blank page, title page etc) numbered, a section break allows you to start numbering from further in the book.  Just make sure that the first numbered page is an odd page.
* Proof read everything!  And then show the file to someone else to proof read some more.  There will be mistakes.  There are always mistakes *sigh*

When you are sure you are done then you can print.  For me, this step is fraught with as much trauma as the rest of the process put together.  Let’s just say, me and double sided printing can be a bad mix at the best of times and it’s even worse when you add booklet mode to the mix.  This is also why I will be offering the option of binding books with single page sections… I also prefer manual duplexing (printing on both sides of the paper) which gives me more flexibility with my page margins on my printer, in return for greater headaches when working out which way to turn the 50+ pages I just printed to have them the right way around for the other sides printing.  Any advice I have to offer is probably just going to be confusing so at this point, just do the best you can.

Assuming you have things under control you will end up with a pile of paper.  The first four sheets will have page 1-16, the next four sheets 17-32 and so on.  Hopefully the diagram below explains this better.  You will want to fold the pages in half (accuracy matters- keep things as neat as possible), and put the sections together so that your pages will appear in the right order.  If they are not, check you have printed them correctly, folded them the right way and that Word has not changed a setting when your back was turned to be annoying.
Page numbering for a four page section (signature) of a book.

Stay tuned for the next exciting installment in bookbinding- how to put your pages together.

Acid free paper- why? And what is lignin anyway?

Whether you are a die hard scrapbooker or a collector of something (for example, Discworld stamps), you have probably encountered the term ‘acid free’ or ‘lignin free’ paper.  These tell the user that the paper is suitable for long term use.  But what do they mean?

For that we need to take a big step backwards to look at the history of paper itself.  Papermaking has been around for a long time- in a 2006 World Archaeological report fragments of linen paper from China dating back to 8 BCE have been reported.  While paper can be made from a wide range of materials including mulberry, flax and hemp, both directly from plants and from old worn out materials like rope, rags and hemp waste, most paper commercially made today is made from wood pulp.

We can use these materials, including wood, due to the nature of the plant material.  Plant cells are surrounded by a special structure called a cell wall.  The cell wall is a strong, flexible structure that helps plants to keep their shape- whether that means a leaf of 5-6 cells thick or a massive eucalypt tree trunk that must support the weight of the branches above.  It does this by stopping cells from expanding too much under water pressure.   Think of a cell like a balloon.  If you keep adding water, it will continue to expand.  However, the cell wall acts like a flexible but non-expanding sock around that balloon- like a fabric bag around the balloon.  While the balloon is smaller than the tube, it can expand.  But once it has expanded to touch the fabric material, it must hold it’s shape.  It can’t expand out because the fabric will not stretch.  If you made the fabric bag long and skinny, the balloon could stretch to a long and skinny shape- and if the pressure of the water is enough, then it will hold that shape and be able to support itself.  Conversely, if you take the water away it will droop- just like plants can droop if they don’t have enough water.

Cell walls are made of lots of different polymers and other compounds in several separate layers.  The main component is cellulose (35-50%) which is made of thousands and thousands of glucose molecules linked together to make a long chain.  This is the stuff that we are interested in to make paper.  The long chains of cellulouse from wood (or the plant material of choice) are processed form fibres suspended in liquid.  These fibres are then passed through a fine screen so that the water drains away, leaving a thin layer of randomly tangled mat of fibres.  When this dries, we have our piece of paper.

But cellulose is not the only component of cell walls.  One of the other major components is lignin.  Lignin is a complex polymer (for just how complex, see the Wikipedia entry for it) that makes up 10-25% of the cell wall.  In the plant it acts to strengthen the cell wall.  But if left in paper it will break down over time.  Newsprint has most of the lignin still in it.  Over time lignin will react with oxygen in the air and form a yellow colour- this is why newspapers yellow over time and why those making scrapbook paper art don’t want lignin in their papers.

Paper can be chemically treated in the production process to remove most of the lignin but the process is acidic.  The downside of this process is that the paper produced is acidic (pH less than 7).  Over time the acid reacts with the cellulose and degrades it- breaks it down.  This is a bad thing if you want to store information in a book, wrap up a precious object in tissue paper (as the acid will also act on the object, particularly if it is a natural material like cotton or linen), or have something precious in contact with it, like stamps in an album.

So to sum up.  If you are making a book, scrapbooking old family photos, storing your stamps or wrapping up your baby’s first outfit to save for your grandchildren, you might want to consider the paper you are using.  Acid free means that the paper will not degrade over time, nor will it damage anything it is in contact with over time.  Lignin free means that it will not yellow over time.  If you have some paper that you don’t know is acid free or not, pH pens exist that you can test your object with.  These are textas (or markers) that change colour based on the pH of the paper.  Just put a dot on an unobtrusive section and compare the colour to the chart that will come with the pen.  If you have something that is acidic that you want to preserve, there are pH neutralisers available in spray cans that should work on all papers (your results may vary, etc etc).

And if you just want to print out an assignment for uni, don’t worry about it.  No one will, including you, will ever want to look at that piece of paper again so just use whatever is cheap and handy and don’t forget to recycle it after!

Thursday 23 June 2011

Stamp Paper Mache

I think everyone has made something out of paper mache at one point or another. Whether it was using a balloon as a mold to make a space helmet (Year 8 science project for myself) or making a bowl of some sort in primary school for Mother’s/Father’s/Keep-the-kids-busy-for-a-while-because-teacher-has-a-migraine Day, paper mache is a simple yet fun craft.

What I didn’t know (but now do thanks to Wikipedia) is that paper mache (French for ‘chewed paper’), has been used for all sorts of things. In addition to range of decorative objects and architectural design elements there have been some rather different uses. Paper mache was used to make boat hulls for small canoes in the days before fiberglass- the versatility and relative light weight nature of paper meant that the shape could be customised easily and were very competitive.
Paper mache was also useful for creating domes, particularly those for observatories. Because of the light weight of paper mache, it mean that the domes could be easily rotated and moved as needed so the telescope could point in any direction. And perhaps the most usual of all, the French used it to create sabots, the structure around bullets and artillery shells to keep the projectile stable in the barrel of the gun (or cannon) and to trap propellant gases, which increases the muzzle velocity of the projectile.

Why am I talking about the history of paper mache? Well because I get distracted by interesting facts easily. And I have a new stamp related craft tutorial for you all. Which, as you may have guess, involves using stamps to make paper mache objects.

For this project, I have used Discworld Cinderella stamps, mainly because I have quite a few spares of them sitting around in envelopes (five years of collecting does that!) But you could also use spare cancelled stamps (or new unused stamps if you are feeling rich!) or Cinderella stamps from the designer of your choice if you have enough of them.

How many do you need? Well that depends on how big a project you have in mind. For reasons of economy, I made two small objects, a plate and a bowl. However, the only real restriction you have is the number of stamps that you have. If you want to make a 100% stamp creation, I would say that you want a layer of four to five stamps as a minimum. You can also eke out your supply by using plain paper for the middle for strength and using the stamps as the outer layer for decoration. If you do this, I suggest you use acid free paper (to prevent the stamps from discolouring from acid leaking through over time) and pre cut or rip the paper into stamp sized pieces.

You will also need something to act as your mold. I used a pretty little plate I got on holiday years ago and the glass bowl from a scented oil burner for the bowl. You could use a vase, bowl, balloon or even Terry Pratchett's hat if you happen to have it handy!

Next step is to cover your mold with cling wrap (glad wrap, plastic wrap, or whatever you call it in your area). This has two purposes: to protect your object from any damage; and to make it easy to remove the paper mache when it’s done. Try to have as smooth as surface as possible on the side you will be sticking stamps to.

And you are ready to go! If you are using unused stamps then all you need is a damp sponge to moisten the glue on (or a very patient tongue). If you are using cancelled or ungummed stamps, you will need to use some glue- the cheapest method is to use flour glue. One part of flour to 2-4 parts boiling water (depending on how thick you want your glue). Sift the flour well and add gradually to boiling water on the stove for two to three minutes (it should thicken slightly). If you want to store the glue then it’s a good idea to add ½ teaspoon of teatree oil to prevent it from going mouldy. Alternatively, you can water down PVA glue.


If using real stamps you can extend your supply by using selvedges for the middle of your object since no one will ever see this bit!
Place the stamp onto the cling wrap covered mold. Repeat. And then do that some more. You should aim to evenly cover the mold with at least 3-4 layers. Once done, leave your work to dry. A quick note if you chose something like a very rounded bowl or a vase- don’t have your final layer done at this point. If making a vase or a bowl, you may need to cut your paper mache in order to get it off the mold. Use a craft knife to VERY CAREFULLY cut through the paper (it is also a good idea to not use an expensive fragile antique as your mold for this reason). Don’t panic though- once it is off, you can add another layer or two to your paper mache and this will hide the cut marks completely.

Bowl with mold removed- plastic still present
Plastic removed from paper mache.  The shiny effect is due to the stamp glue
Your work should hold its shape at this point
Once your work is done, gently use the cling wrap to pull it off your mold. The paper mache should be slightly flexible but hold its shape. If it doesn’t then you have not used enough layers- put your work back onto the mold and add a few more. Pull the glad wrap off your paper mache.

You may choose to then add stamps to the other side of your paper mache or you may like the stamp like feel of having a gummed and patterned side. If you think your work is feeling a little flexible or flimsy, then add some more stamps to strengthen the structure. You may also choose to trim the edge (fun idea- use scalloped scissors to give the edge a perforated feel), leave the edge rough, or fold the edge over and then add stamps to the other side. When you have finished, leave the work to dry.

While you could declare your work finished at this point, I highly recommend using a varnish of some sort to seal your work. This protects the piece from damage, particularly from damp and water. Remember, if you used new stamps the only thing holding your piece together is the water soluble glue. If you stuck this thing in water it would eventually disintegrate the same way a stamp comes of an envelope when soaked in water. Several thin layers are generally better than a single thick layer, or otherwise follow manufacturer’s instructions.

When complete, sit back and enjoy your stampy artwork.
The finished product- not the different edge effects that can be achieved

Online game recommendation #1

If you are looking for fun diversion online, Eyez maze's GROW series of games are fantastic. Link will take you to GROW Cube, but there are many others- the series will keep you amused for some time!

Not only are they insanely cute but they are great logic exercises. The premise is simple- you have a series of buttons. Pressing a button will introduce that item to the world. But in order to win the game you need to click the items in the correct order. It requires patience and logic (or if you are terrible at patience and logic, the use of a search engine to find the solution posted online). But try working it out for yourself first! Watching the animations for 'wrong' sequences is also entertaining and in a few of the games, there is not necessarily one answer.

Tuesday 21 June 2011

Make an origami spoon

The finished product
Ok, so when you think origami models, kitchen utensils may not be the first thing to come to mind.  But for reasons of my own I was after an origami spoon.  Since I couldn't find one, I mucked around a bit until I came up with something that worked.


Start with a piece of paper.  I used square when making this tutorial, but you can use a rectangle if you like.  If you use a rectangular piece, start with the paper as landscape (ie, make the first fold along the longest length).
Fold the paper in half and open again.
Fold the two top and bottom edges into the middle.
Fold the top and bottom edges into the middle again.
Open up the folds from the last step.
Take the bottom corner and fold up to the top and then unfold.
Take the top corner and fold down to the edge and then unfold.
Valley fold the paper at the point where the two preceding folds meet the edge (if you started with a square piece of paper, this will be the middle, if you started with a rectangular piece of paper use the fold lines to guide you).
OK, describing this is a little tricky.  Using the diagonal folds to guide you, form a triangle shape (for those familiar with origami, it is a balloon base top).
Turn over.
Fold in the top and bottom edges into the middle (along previous folds)
Fold the top and bottom edges into the middle again (to form the spoon handle).

Turn over and use a finger to open up the triangle section to form the spoon.
Fold the two corners into the spoon.

Tada! You are done.

 And why?  Because I wanted to do something with an Anoia discworld stamp.  And as everyone knows, Anoia is the Goddess of things that get stuck in kitchen drawers.
Besides, it's easier than trying to come up with a origami egg whisk :P

Origami fun

I got a new book yesterday and spent the afternoon happily working from it.  The book is 'Origami Jewellery' by Ayako Brokek and, not surprisingly, talks about how to make jewellery using origami.  This is something that I have dabbled with a bit in the past, but the book is useful as not only does it give jewellery design ideas, but it the diagrams are also suitable for smaller models.  While there are some lovely origami models out there (many that are beyond my skill level anyway) trying to make them out of small paper just isn't possible.

Why?  Well aside from the fact that things get fiddlier the smaller the paper, there is also limitations in the paper itself.  Remember the old fact that you can't fold a piece of paper in half more than seven times?  Well it's not entirely true- there is a Mythbusters episode that demonstrates this fact. However, they started with a really really big piece of paper and they also used a steam roller for the last one or two folds!  As paper gets smaller, it gets even harder- the thickness of the paper means that each fold is slightly bulged at the crease (take a piece of paper and fold it repeatedly and you'll see what I mean).  This influences the model far more on a small model than a large.

So some models have worked better than others, although I'm fairly pleased with the results for a first attempt.  These are experimental for an idea I have- which will use paper even smaller (yes, I know.  I'm mad, but I have a reason!).  The lines on the cutting board are centimeter marks and all the models were made from paper the size of the square shown- you can see how some models shrink in size!  The poor little owl (next to the square of paper and under the butterfly) has a very rounded head thanks to the relative thickness of paper.  I think I'll try a drop of glue to help hold him together in the final result.

But interesting side note- while checking a few things online for this post, I found a site that demonstrates that a piece of paper CAN be folded more than eight times.  In fact, they got to twelve folds!  Britney Galivan, the woman who figured it out, was both sneaky and clever.  She used an extremely long strip of paper and then worked out a way to fold the paper.  Impressive!

Now I'm going to head back and move into phase 2 of my grand plan (mwa hah hah hah.... erm, sorry).

If you want to try yourself there are some great sites online with diagrams and videos.  Just type origami instructions or origami diagrams into your favourite search engine.  Do start with something simple to start with- while that lovely dragon pattern looks fantastic, you will find it far better to get some skills under your belt (or fingertips), lest you end up with a large pile of origami rocks (take paper, scrunch up, throw away in frustration- repeat).

Monday 20 June 2011

Strange crafts

I'm on uni holidays right now so I've been able to indulge my crafty side.  All those kits, magazines and webpages that I've accumulated over the years intending to get around to, I've dug out and at least looked at the packet, if not attempted!

Right now I'm taking a breather from my first attempt at making felted wool balls that will ultimately be decorated and turned into a broach- a kit I bought from the Melbourne Craft Fair a few years ago.  The process is very simple- essentially you are using warm water and soap to turn long fibres of wool (merino) into small dense felted balls.  These can then be embroidered or otherwise decorated and then essentially used as beads.

But there are never enough craft projects- I always love learning something new.  So what does a girl do when looking for something new to do?  Hit google, of course.  Unfortunately with search engines, they don't always give you what you are looking for.  I typed 'strange craft' into google and got- pages filled with links about UFOs. *sigh*  Time to go refine some search terms...

Do you have any suggestions for interesting crafts to try?  Feel free to leave some suggestions in the comments section- my only limiting factor is my budget.  Some start-up costs (assuming I can't make do with stuff in my assorted crafts stashes) is OK but if, for example, I need to go an buy a kiln, then sorry, no can do!

Sunday 19 June 2011

Bag organiser finished!

Or if you prefer, the alternate title: It's not a mistake, it's a feature...


The organiser consists of a large inside pocket and then three smaller pockets on each side at the bottom for smaller things.  I was planning on having both black sides facing out but I wasn't paying a lot of attention when adding the three pockets.  After a careful consideration of my options (unpick a lot of stitching or make do) I decided that it was a design feature cleverly planned to make it clear which side is which when digging in the bottom of the bag.  It also lets you see the contrast fabric.  See? I did it just for you, blog readers!

There is a truth that you should never examine anything you make closely- you will always see things that are wrong.  Not being much of a seamstress, there are many flaws. In hindsight, using heavy interfacing on the large pocket did make things very awkward when sewing- particularly at the end when I was adding the bias tape around the bottom corner (there was lots of layers of fabric, seam and interfacing at the two bottom corners).  Some of the stitching would definitely not give me marks from my old textiles teacher!

I think the idea of an organiser is a great one and could be easily adapted to any size bag.  It's great if you have a big cavernous bag that things disappear to the bottom of on a regular basis.  And if you like to swap bags on a regular basis it gives you a simple way to swap stuff from one bag to another fast. I think I'll try designing my own down the track once I get a better feel as to what I need in my great cavernous bag of mystery on a regular basis (I'm thinking that small pockets for each of my gadgets might be good- phone, ipod, ebook plus other general essentials).

Friday 17 June 2011

Playing with a new toy

Yesterday I succumbed to temptation and bought a new sewing machine.  My old one (which I had inherited) always drove me mental trying to get to work and after trying to use it on the weekend and finding I could not even sew a straight line, I cracked.

My new toy is a Brother NS50 for those interested- lots of nice features I've never had on a machine before and a large number of different stitches.  Now the stitches were not originally on my shopping list, but after eventually deciding on this machine for other reasons, I'm not going to complain about it.

So I sat down to use it yesterday.  I'm making a bag organiser- partly because I've a big handbag that is essentially a giant tote bag with no internal pockets, and partly because I'm not terribly experienced in sewing, so if the results are less than professional, no one but me will ever see it!  I'm using McCall's pattern M4851 which is a pattern for two virtually identical tote bags and an organiser pocket- we'll see if I decide to make a tote bag sometime down the track.

Step one is to create two large flat pieces to form the sides of the largest pocket.  The pattern says to use straight stitching vertically down the sides to join the two pieces of fabric (and interfacing inside to stiffen the side).  But since the pattern referred to this as 'decorative stitching' and since I had just unboxed my nice new toy, my first thought was 'Oooh!  Excuse to use fancy stitches to test machine!'  And my second thought (no doubt assisted by the fact I had 'The Princess Bride' on while I worked, was 'Oooh!  My machine has letters.  I could put quotes on the sides as well!

So here are the two sides with decorative stitching.  Virtual geeky cookie to anyone who can identify all the geek references.  I'll post more as the work progresses.

Thursday 16 June 2011

The Story of George Too

George 2 by Kelshandra
George Too the Monkey
Back when my little nephew was about two, his mum (my sister) knitted a toy monkey for him. Not being an expert knitter this took her quite a while and she had to learn many new stitches and techniques in the process.  She finally finished it and proudly presented it to him only to find- that he ignored it.
However, her then two year old younger daughter loved it and George became a vital part of the family, particularly at bedtime.  But then one day the unthinkable happened- George went missing.  The search was long and extensive.  Multiple houses were checked to see if George had not been left at Grandma's house or at a friends.  Rooms were torn apart, all to the sad pleading cry of 'George?  Where's George?'.  But to no avail.  George was no where to be found.
Much crying ensued- the only respite my frazzled sister found was when she bought another kit and started making another.  But progress was slow and bedtime approached.
'Mummy, I want George'.
'You can't, George is lost'.
'No he isn't'.
'What?  Yes he is...'
Cue two year old getting up and heading to her brothers room and reaching behind an impossibly small gap and pulling out a slightly dusty George.
Surprisingly, I still have a niece :P  Cuteness must be a survival trait for small children for just this sort of situation.  But after that affair, when I saw a George kit going cheap in a shop, I thought it would be a good idea to make one myself- just in case!

The kit instructions were well written.  The yarn is interesting- a cotton acrylic blend I've not encountered before (and my wool stash is rather extensive!).  The biggest complaint I had was there was only just enough of the main colour- and that only because I made the legs two rows shorter than the instructions.
Oh, and my biggest advice?  Don't try stuffing the legs with a two and four year old watching as they will try and help, each grab a handful of stuffing bigger than George's head and then argue over who is going to put it in!
The George family
From left- original George, George Too and Jesse (who my niece insisted must be in the photo too!)

Wednesday 15 June 2011

Yep, it's yet another blog

Hello world!  I decided that what the world really needed was yet another blog.  I'm interested in all sorts of crafts, some of which I actually have some skill in, others that I just dabble with.  In this blog I plan to share my projects, experiments, disasters and anything else that seems like a good idea at the time.

I was a mad scientist but I'm currently jumping careers and am back at uni to make that happen.  I love all things geeky, from science stuff to science fiction to fantasy.  My name- Geeky Goblin- is a tribute to one of my favourite movies of all time, The Labyrinth.  That and a few of my other options were already taken.