No tutorial for this post, just a few things I've knocked together at the half way point of my holidays. Since I was already in the process of working on something for my car, I tried making a rubbish bin to pop in the card using a great tutorial on Crafster. While the original tutorial included both a inner, removable bag and an outer fabric liner, I elected to just make a single plastic bag with a tag. It won't be terribly obvious where I keep my bin anyway.
This was a great, cheap project as the material is from my ill fated sashing for the quilt top shown here. After making the sashing, laying it out next to the quilt my first thought was.... 'yuck, that doesn't work'. The trick is going to be working out what to do with the rest of it now! The plastic is a recycling job using the plastic from a set of sheets I bought a while ago. You can also buy it by the meter at Spotlight or similar but don't bother if you only need a bit like I did! Although this bin won't be water tight, it will be easily cleanable if a few drops leak out of an empty coffee cup or the like and who puts full drinks into the bin in their car anyway?
I've also been working on a crochet bag on and off as it fits nicely in my day to day bag as a travel project. I'm about 3/4 of the way through the crochet side of things, then I have to work out if I want to try and dye the motifs (I couldn't find cotton that was a colour I liked so the pale blue is not my first choice) and finding the necessary other bits and pieces. I probably won't finish the crochet before the end of the holidays but I'll see if I get motivated!
Sunday, 13 July 2014
Tuesday, 8 July 2014
Status update
Yes it is school holidays again which means I can dust off the project to-do pile and have something to blog about once more!
Although I've been off for a week now, things have been slow on the production front. However, I did have a lovely time down at the Melbourne Craft Fair at Jeff's Shed (the Melbourne Convention Centre for non-Victorians). I was relatively restrained but I did leave with two shopping bags full of bits and bobs that I'll get around to gushing about soon.
I have also spent the morning on a long needed project- sorting through my beading stuff and trying to get it into some sort of order. A task that I had successfully achieved (including condensing things into two large boxes rather than two large boxes and one medium box), put everything away onto the shelf and- d'oh!- discovered a forgotten plastic storage box of misc beads. Now to see if I can squeeze it in somewhere or if it is back to the drawing board.
I also discovered in the process that I have an awful lot of seed beads that are mostly still in their correct storage compartments. Anyone who does beading will know the 'joy' of using those oh-so-useful divided plastic boxes only with lids that don't quite form a bead proof division all the way around in at the lid-divider junction.
The upshot is that for the next few weeks I'll have some projects to show either in progress or finished with instructions. That's the goal, anyway!
Although I've been off for a week now, things have been slow on the production front. However, I did have a lovely time down at the Melbourne Craft Fair at Jeff's Shed (the Melbourne Convention Centre for non-Victorians). I was relatively restrained but I did leave with two shopping bags full of bits and bobs that I'll get around to gushing about soon.
I have also spent the morning on a long needed project- sorting through my beading stuff and trying to get it into some sort of order. A task that I had successfully achieved (including condensing things into two large boxes rather than two large boxes and one medium box), put everything away onto the shelf and- d'oh!- discovered a forgotten plastic storage box of misc beads. Now to see if I can squeeze it in somewhere or if it is back to the drawing board.
I also discovered in the process that I have an awful lot of seed beads that are mostly still in their correct storage compartments. Anyone who does beading will know the 'joy' of using those oh-so-useful divided plastic boxes only with lids that don't quite form a bead proof division all the way around in at the lid-divider junction.
The upshot is that for the next few weeks I'll have some projects to show either in progress or finished with instructions. That's the goal, anyway!
Sunday, 4 May 2014
Magnetic pen holder from a mint tin and making wire flower vines
This was a post inspired from the sense of Eclipse mints*.
waste every time I finish a tin of
Browsing Pinterest and other sites I've often seen very cool things people have done with Altoid tins. However, Altoids (or their tins) are not available here (and I get the impression that the mints are really strong which is not my preference anyway).
Sadly the design of an Eclipse mint tin does not easily lend itself to repurposing. The opening is on the short end and is small enough that putting in a finger to dig out a mint is a little fiddly. But pinterest did show me one idea that I've run with- a magnetic pen holder to pop on the fridge.
Making it is fairly easy. Step one was to roughly sand the surfaces so the paint will stick to it.
Then using acrylic paint, paint it with your base coat. You may need to do several coats to cover all the original printing. Also, the front of the tin has the name embossed- I used the other side on my finished tin, or you will have to think about a creative way to hide this.
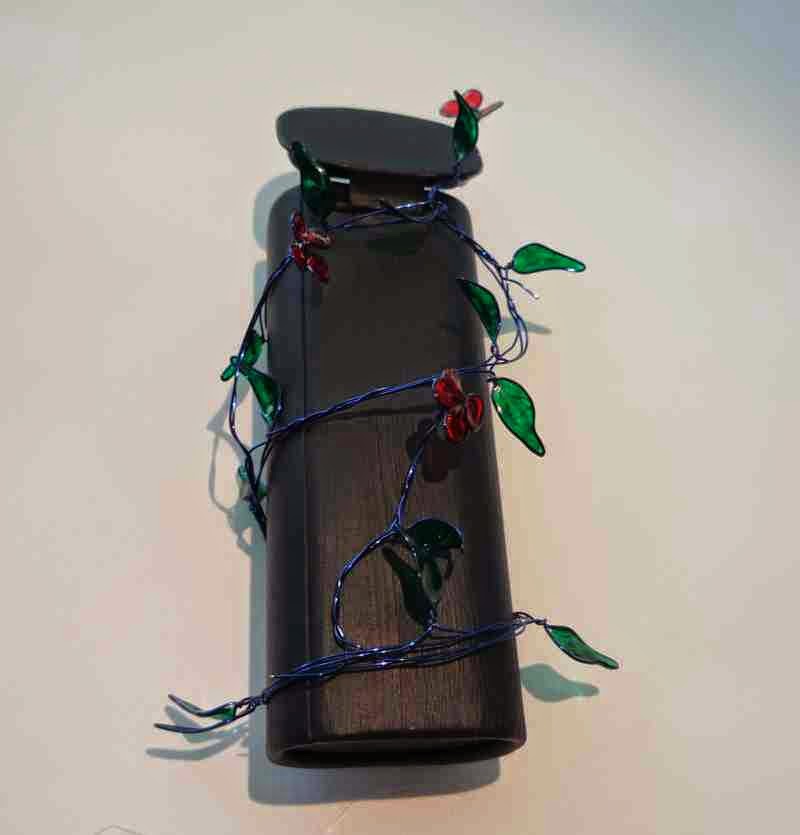
At this point, the design possibilities are endless. You could paint it, stick stuff on it, anything really. Or just glue some magnets to the back and call it good. I have gone with a creeping vine that I made in the previous post so below is my very simple idea for joining it on.
Basically my secret tool is my hot glue gun. It works well for fast fixes and the join is strong enough to hold the wire to the painted tin.
Secure one end to the tin and fix in place.
Then artistically curve the vine up and secure whenever you like at the back where it will be hidden.
Something that I didn't do because I only thought of it too late, is to make a trellis from paper or card that the vine can be climbing as I think my background colour was too dark to let the flowers and leaves glow suitably. Next time I finish a tin of mints, perhaps I'll try version 1.2!
One tip though that I unfortunately discovered- hot glue is not strong enough to hold a strong magnet to the tin if your magnets are strong. When I went to pull my pen holder off the fridge to reposition it, the magnets were left behind. Ooops. A bit of E6000 glue later and I hope the problem is solved.
I also added a label to the lid, mainly because that oval shape screamed 'label' to me and I needed to add something.
So there you have it. Simple but useful and very cheap to make.
*Disclaimer: I don't even have Adsense turned on on this blog, let alone get sponsored by anyone so this post is not an endorsement to Eclipse mints or any other company*
waste every time I finish a tin of
Browsing Pinterest and other sites I've often seen very cool things people have done with Altoid tins. However, Altoids (or their tins) are not available here (and I get the impression that the mints are really strong which is not my preference anyway).
Sadly the design of an Eclipse mint tin does not easily lend itself to repurposing. The opening is on the short end and is small enough that putting in a finger to dig out a mint is a little fiddly. But pinterest did show me one idea that I've run with- a magnetic pen holder to pop on the fridge.
![]() |
| My finished pen holder doing it's job on the fridge- hence the weird reflections |
Making it is fairly easy. Step one was to roughly sand the surfaces so the paint will stick to it.
Then using acrylic paint, paint it with your base coat. You may need to do several coats to cover all the original printing. Also, the front of the tin has the name embossed- I used the other side on my finished tin, or you will have to think about a creative way to hide this.
At this point, the design possibilities are endless. You could paint it, stick stuff on it, anything really. Or just glue some magnets to the back and call it good. I have gone with a creeping vine that I made in the previous post so below is my very simple idea for joining it on.
Basically my secret tool is my hot glue gun. It works well for fast fixes and the join is strong enough to hold the wire to the painted tin.
Secure one end to the tin and fix in place.
Then artistically curve the vine up and secure whenever you like at the back where it will be hidden.
Something that I didn't do because I only thought of it too late, is to make a trellis from paper or card that the vine can be climbing as I think my background colour was too dark to let the flowers and leaves glow suitably. Next time I finish a tin of mints, perhaps I'll try version 1.2!
One tip though that I unfortunately discovered- hot glue is not strong enough to hold a strong magnet to the tin if your magnets are strong. When I went to pull my pen holder off the fridge to reposition it, the magnets were left behind. Ooops. A bit of E6000 glue later and I hope the problem is solved.
I also added a label to the lid, mainly because that oval shape screamed 'label' to me and I needed to add something.
So there you have it. Simple but useful and very cheap to make.
*Disclaimer: I don't even have Adsense turned on on this blog, let alone get sponsored by anyone so this post is not an endorsement to Eclipse mints or any other company*
Sunday, 27 April 2014
Making flower vines
I was going to have this as part of another post but decided this is better as a stand alone tutorial as there are many potential uses for this technique. The next post will show you how I used the flower vine I made here.
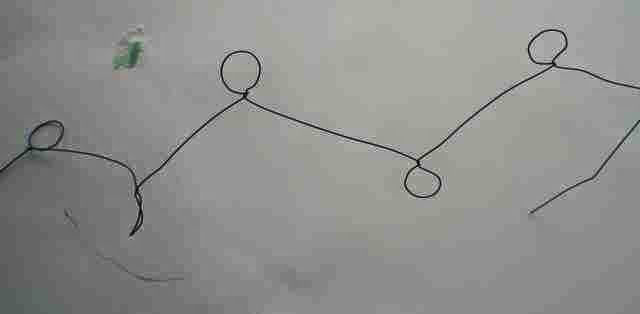
To make the vine, estimate how long you want your vine to be. The main wire should be about 2.5X this length. I went with about 50 cm long. Using something about the right width (a pen or pencil are ideal), create a series of loops roughly evenly spaced along the wire.
Each of these loops will become leaves, so now shape them as you wish. The easiest way to get a leaf shape is to gently pinch the top. Of course if you are a botanist, feel free to go and google the species you wish to mimic and shape your leaves accordingly.
Now use your medium of choice to fill in the shapes. I went with Mod Podge Dimension Magic but in this post I investigate several different materials you can use.
Let this dry and (if you used a transparent filler as I did) use a permament to colour in the leaves. The layer may be very thin- be careful not to make holes, but if you do (or if you feel it is too thin anyway), add another layer of medium.
Flowers are made in a similar way to leaves. It is best to make each flower from a separate piece of wire (about 20 cm is a good length). I used a slightly smaller diameter stick to make four loops very close to each other for the petals and sometimes also added a leaf or two to the remaining length
Now to put it all together. Take the main length of leaves and double them over. Start at the bottom and gently twist them together. At intervals, add the flower wires and incorporate them into the main stem as you twist.
Continue the length of the main wire.
You can trim any stray bits of wire if you wish. You may also want to wrap florist tape around the 'stem' to hide the wires and make it a bit more natural looking. This is also a good idea if you plan on using this length of wire as jewellery or a hair decoration as those little ends of wire may try to poke the wearer otherwise!
I love the transparent effect you get using permanent markers. The depth of colour can be increased by using multiple layers of your clear filling material (a good idea for strength anyway) and colouring each layer as you go. Or get fancy with a fine tipped pen for further detail, similar to the painting on stained glass windows in old churches.
Somewhere in the distant future I plan on playing with this more to make some jewellery but if you beat me to the punch, I'd love to see! Leave a comment or shoot me an email.
To make the vine, estimate how long you want your vine to be. The main wire should be about 2.5X this length. I went with about 50 cm long. Using something about the right width (a pen or pencil are ideal), create a series of loops roughly evenly spaced along the wire.
Now use your medium of choice to fill in the shapes. I went with Mod Podge Dimension Magic but in this post I investigate several different materials you can use.
Let this dry and (if you used a transparent filler as I did) use a permament to colour in the leaves. The layer may be very thin- be careful not to make holes, but if you do (or if you feel it is too thin anyway), add another layer of medium.
Flowers are made in a similar way to leaves. It is best to make each flower from a separate piece of wire (about 20 cm is a good length). I used a slightly smaller diameter stick to make four loops very close to each other for the petals and sometimes also added a leaf or two to the remaining length
Now to put it all together. Take the main length of leaves and double them over. Start at the bottom and gently twist them together. At intervals, add the flower wires and incorporate them into the main stem as you twist.
Continue the length of the main wire.
You can trim any stray bits of wire if you wish. You may also want to wrap florist tape around the 'stem' to hide the wires and make it a bit more natural looking. This is also a good idea if you plan on using this length of wire as jewellery or a hair decoration as those little ends of wire may try to poke the wearer otherwise!
I love the transparent effect you get using permanent markers. The depth of colour can be increased by using multiple layers of your clear filling material (a good idea for strength anyway) and colouring each layer as you go. Or get fancy with a fine tipped pen for further detail, similar to the painting on stained glass windows in old churches.
Somewhere in the distant future I plan on playing with this more to make some jewellery but if you beat me to the punch, I'd love to see! Leave a comment or shoot me an email.
Sunday, 20 April 2014
Happy Easter everyone!
Happy Easter everyone! This is another post I've had to sit on until Easter because I wanted to keep it a surprise from my family (particularly my Mum, who is one of the few readers of this blog- hi Mum!).
I finally got myself organised at the end of the first week of holidays to get my Easter eggs bought. I went with a few little assorted eggs, partly because the large packs you can find are often very expensive for very little chocolate, and partly because the chocolate inside is often rather boring, as printing on cardboard is cheaper to make than making fancy eggs.
But how to hold these eggs? There are cute little baskets around but they are often very expensive for something that is used only long enough to hold the chocolate and then disposed of. So, since I am currently on a bit of a crochet kick, and since crochet is a fast craft (at least compared to knitting), I googled for crochet baskets to see what I could come up with.
I ended up making my baskets based on this pattern, that I found on Crochet Spot. Scrounging through my wool pile, I found the left over balls of acrylic yarn I had from making Noel the Gnome. Changing colours every other row or so means that they kind of sort of have the look of half Easter eggs. That's the logic I'm going with, anyway. By the fourth basket I had run out of a few colours, but I am happy enough with the results.
I finally got myself organised at the end of the first week of holidays to get my Easter eggs bought. I went with a few little assorted eggs, partly because the large packs you can find are often very expensive for very little chocolate, and partly because the chocolate inside is often rather boring, as printing on cardboard is cheaper to make than making fancy eggs.
But how to hold these eggs? There are cute little baskets around but they are often very expensive for something that is used only long enough to hold the chocolate and then disposed of. So, since I am currently on a bit of a crochet kick, and since crochet is a fast craft (at least compared to knitting), I googled for crochet baskets to see what I could come up with.
I ended up making my baskets based on this pattern, that I found on Crochet Spot. Scrounging through my wool pile, I found the left over balls of acrylic yarn I had from making Noel the Gnome. Changing colours every other row or so means that they kind of sort of have the look of half Easter eggs. That's the logic I'm going with, anyway. By the fourth basket I had run out of a few colours, but I am happy enough with the results.
I've been able to fill them with a nice amount of chocolate (with a bit of quality testing as I worked- I can't give my family bad chocolate, after all!). If I was feeling more energetic or evil, a fun idea would be to then crochet up further to A) make an egg shape and B) make it really hard to get the eggs out. But that would be mean. Besides, I ran out of yarn. :P
Happy Easter!
Subscribe to:
Posts (Atom)