Thursday, 15 December 2011

Dressing up Barbie

Christmas is coming (I'll pause to allow those who have not realised it yet to gasp in shock) and that means finding presents for my family.  Today's post covers the present for my three year old niece who can't read or search the internet yet, thus making it safe for me to post about.

Given that my knitting addiction shows no signs of abating I thought I'd make some more clothes for Barbie.  Partly to feed my crafting addiction and partly because it seems hard to even find clothes in the shops- it is a tad excessive to need to buy a whole new doll every time you want to get a new costume!

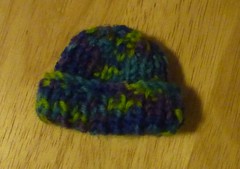
So I searched Ravelry and found a magnificent site for knitting Barbie patterns: Sticka till Barbie.  There are hundreds of different patterns there!  Using some left over sock yarn I had, I quickly whipped up a little coat and a little hat (#88 and #A40 respectively if you are looking for the pattern).
barbie jacket  barbie hat

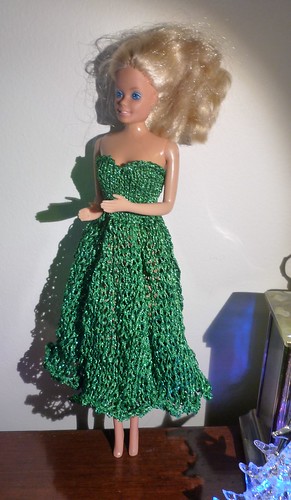
Then yesterday I was prowling in a little local craft shop that I had not visited before and found some lovely sparkly fingering yarn (Peter Pan Washable Goldfingering).  It was just cheap enough that I found myself justifying my purchase.  I ended up choosing pattern #984, Green Long Gown to make.

Due to the amount of yarn I had though (about 100m on the ball) I ended up having to modify the pattern a bit.  While the original was for a floor length gown, I had to make a shorter skirt.  To make the edge of the skirt more interesting I also used a picot bind off.  Attempt one though was going to need a bit more yarn than I had (I was about 20 stitches away from finishing when I ran out and needed to go back and pick up 180+ stitches- d'oh!).  I decreased the number of picots and all was well (I cast on 2, bound off 6 and repeated this pattern right the way through).

Here is one of my old Barbie dolls testing out the dress (two photos, one without flash, one with because the detail shows better without but the colour is truer with flash).   It is now wrapped up, ready for Christmas day and I can now get back to knitting my Queen Anne's curse (I've nearly finished Chart 3).
Barbie dress 2 by Kelshandra
Barbie dress in green

Monday, 5 December 2011

A special swamp dragon for your Hogswatch tree

For those who are not familiar to Discworld you have two choices- go away and read all the wonderfully funny Terry Pratchett books you can get your hands on, or just skip to the part where I talk about making a pom-pom dragon and ignore the weird references to explosions and the Hogfather.

For everyone else, this is a little project that I wrote up for my Hogswatch card recipients this year (I wanted to send the supplies to go with it but sadly this would've made my envelopes too large to be sent as letters, let alone cards, and postage is expensive enough to the other side of the world without making parcels.  So they, like you, will have to scrounge up some supplies to work with.  As you will see though, this is not particulary hard- pom-poms can be made, pipe cleaners are necessary and glue, felt and googly eyes are fun to buy and not expensive.

This project is to make a little swamp dragon to hang on your tree- or a bunch of them, stitting in the tree, flaming softly, inadvertently exploding when the crackers are pulled, drooling and disolving the presents underneath...  it wouldn't be Hogswatch without them*!


Pom-Pom Swamp Dragon
Materials needed

  • 1 Large pompom
  • 1 Medium pompom
  • 3 or 5 Small pompoms
  • Pipe cleaner
  • Felt
  • 2 Googly eyes
  • Glue
  • Scissors
  • String
1. Glue the small pompom for the dragon snout to the medium pompom (the head). Glue this head to the large pompom for the body. Glue the googly eyes onto the head.
Glue small pom-pom to medium for snout and googly eyes above this to make the head.

2. Cut your pipe cleaner to 12 cm in length and bend into a M shape. Use two shorter lengths of pipe cleaner wrapped around the two top corners of the M to make the wing supports for each wing (see picture)


Step 2 and 3- Pipe cleaner and felt guide

3. Cut the felt to the shape of your wings. Glue the felt to the wings, then glue the wings to the body.


4. Cut a long triangle of felt for the tail. Cut a short length of pipe cleaner and glue to the tail felt. Glue this to the back for your swamp dragon tail.


5. Glue the remaining small pompoms for the legs of the dragon. You can also glue another two for the arms but I ran out of pompoms!
Awe, how could you not want to make this little guy?

Tie a short length of string around the body so you can hang up your Hogswatch decoration! And leave a comment or send me a picture if you make one.  I'd love to see!


* Swamp dragons on trees are not part of official Discworld cannon.  But they would be brilliant, don't you think?  I mean it's not that far in terms of insanity to the Victorian tradition of the tree filled with burning candles, right?

Sunday, 4 December 2011

Queen Anne's Curse

Time for a new knitting project! I have not totally finished the Labyrinth bag yet but the weather has been too cold for blocking.  I like to block outside on hot Melbourne days because things dry nice and fast- the weather and my schedule have not meshed yet so I've a few things in the block queue.

I decided that now was the time to make Queen Anne's Lace (ravelry link), a lovely pattern designed by MMario.  I had stumbled on the crochet cotton I had bought years ago to make it so I even had the material needed on hand.  After some searching I found my double pointed needles (DPNs).  While I seem to have more than a dozen (all metal- this will be important later), it also appears that the only size I have is 3 mm so that decided the gauge!  Casting on was as fiddly as all get out.  That first join and then the first few rounds, all while juggling four very slippery needles caused a few false starts but once I got a few rows in things got a little easier.

Then disaster- one of the needles dropped (cotton on metal- no friction to speak of.  Gravity and indeed, random gusts of wind will be sufficient to pull needles out.  Recommended for use only in zero G by masochists) and 4-5 stitches fell off.  Bad words were said.  Saying a prayer to the knitting gods I tried to quickly pick up the stitches before they noticed they were free and unrestrained.  While a few seemed a little wonky, I thought I had gotten away with it.  A few rounds later I switched everything to a cable needle (ripping the packaging open to get it- apparently I had bought a 3 mm circular needle some time ago but didn't need it until now- this will be important later).  A few further rounds (to row 20 to be precise) I had enough room on the cable to pull back and see how the lace was developing...
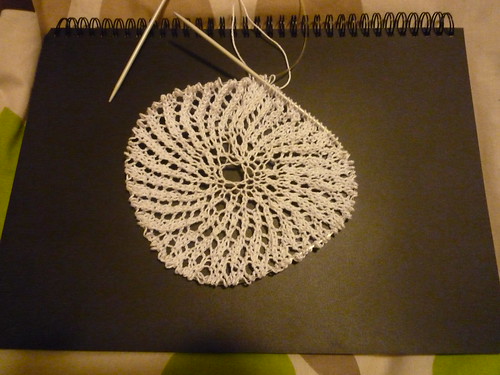
Queen Anne disaster #1
Attempt #1.  Can you see where the pattern goes wrong?

Yeah, turns out that I hadn't picked up those stitches as well as I had thought.  And because of the needle, over half of the pattern was out of phase- you can see in the picture above that the pattern (moving anticlockwise from 12) starts out lovely, then goes to put at about 8 o'clock.  There was no way I was going to be able to fix that.  So I sighed sadly and frogged the lot.

Attempt #2
I hadn't made it to the shops (once I had things onto the circular needle there wasn't the same urgency to get some bamboo DPNs.  But I knew of their evil properties now.  I was not going to be beaten by four inanimate objects.  The initial fiddliness was perhaps slightly mitigated by experience this time and I soon was knitting comfortably.  As soon as I could, I transferred the work to the cable needle and could thus banish the evil metal DPNs to the storage tin, safe in the knowledge that my work was now safe on a needle with only two ends where stitches could be lost, not six.  Several rows pass.

I was getting into the flow and things were getting to that zen like state you get when knitting.  The hands do the work on muscle memory, with only the occasional input needed from the brain of either 1,2, yarn over, 1, 2, yarn over... or the slightly more processing rich 'you've reached the end of a row, pause to check what's next' stage.  Both of which generally allow for other entertainment to simultaneously occur (reading things online is my favourite).  I am using the magic loop method (or my weird version of it, I've never worked out if I do it 'properly' since I came up with it on my own- I never realised that people normally use two cable needles and that using only one was odd so I just figured out a method when I first started knitting in the round).

Row 13, which means it is a lace row.  I successfully do the first half of the circle.  I give my cable needle a gentle tug to pull things into place for the second half and- $%*&~!  Why is there just the unattached needle in my hand?  Where's the ruddy cable?  That must mean it’s come of the cable and …. oh no. Please don’t tell me that half my stitches have been pulled off... OK, I won't tell you but don't look at your hand...  And remember readers, that was a new (Sullivans- they are not on my good list so I'll name them! Besides the only reason why I know is because it was a new needle) cable needle.
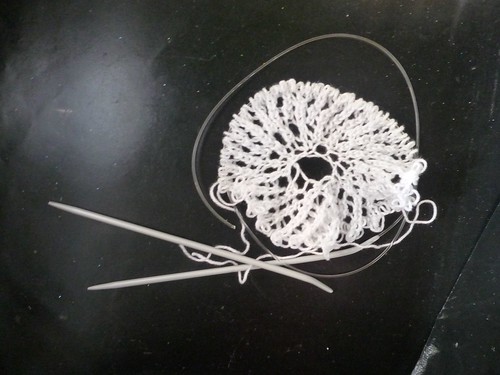
Queen Anne Attempt 2
Attempt #2.  Note the broken cable needle and that large stretch of unrestrained lace

So attempt #2 is dead (well I went to complain to Mum and when I said I was going to rip it apart she said she could probably use the remains on a card so I just cut the thread).

Attempt 3 is waiting until I get a new cable needle (NOT the same brand), probably some new bamboo DPN to start it with and a large bottle of something to make me happy.  I also went back and renamed this project in my Ravelry list.  Besides, Queen Anne's Curse sounds like a pirate ship's name which I like.


Friday, 2 December 2011

Into the Labyrinth Bag Part 1

This is a variation of a lovely bag The Anticraft's online 'zine.  It is called Creeping Jenny and I really loved the innovative design.  It uses a piece of vinyl with holes punched around the edge which the yarn is then picked up through and knitted.  The pattern also uses an interesting contrast of black and a bright green that I love.

The materials I used (due to the difficulty finding supplies sometimes, I had to make a few subsitutions).
  • 1 piece of leather, 16 cm in diameter
  • Smallest leather punch you can find (mine is about 2-2.5 mm in diameter)
  • 1 skein each of '2nd Time Cotton', one charcoal (922) and one avocado (549)
  • 4.5 mm circular knitting needle
  • Stitch markers
I was going to make this as written (well, more or less).  I found a bit of leather (old scrap from my Mum's craft stash) that I cut to shape and punched holes in.  The Creeping Jenny pattern calls for 100 holes around the edge of the 16 cm diameter, or about one 2 mm hole every 5 mm.  But I was worried that this would actually end up weakening the base- think of the perforations on stamps to make them easy to tear apart!  So instead I only made half the number of holes.
Sticky tape is a great way to hold your template in place while you make the holes
I only punched every other hole because I didn't want to have a weak join
To cast on from your base you need a small crochet hook that will fit through the holes of the base.  From the right side, push your crochet hook through the hole and use this to pull a loop of wool to the right side.  Place this onto a circular knitting needle.Repeat until you have 50 stitches on your needle.


In the first round, knit in the front and back of loop to double the number of stitches.  Knit the next four rounds to make the base.

Originally I intended to make the Creeping Jenny pattern- sort of a yin-yang feel pattern.  But then I started to think.  I liked the pattern, but it wasn't quite right.  What I wanted was similar but more like.... a maze... like a labyrinth!  Ooooh....  I saw a lovely example a month or so ago on Craftster using tunisian crochet.  The colours of this are lovely (the only thing that prevented me from changing my colours was the fact I'd already bought my yarn!).  I could've used this pattern but since I'm knitting in the round, I thought it would be nice to have a maze that went all the way around.

To google I went!  Only to find that there were was no such thing out in internet land- d'oh!  There is only one thing to do- make one myself.  Step one was to make a maze.  Now here I did cheat a bit.  In my internet searching I found this terrific maze generator.  It lets you pick the size and dimensions of the maze that you wish to make, along with an option of 'average path length' or 'how far on average before reaching a turn'.  It then makes both a review black and white image of the maze (to get a feel for how it will look as a pattern) along with a graph version.  Because the size will include a border around the edge, I generated a 101 wide by 39 high maze with an average path length of 3.

Half way point when I realised the bag would
be too big with the chart as written!
The resulting graph was lovely and twisty but that border needed sorting out.  So the next step, copy the graph into my go-to cross stitch program.  I did this by hand because the jpg of the maze generated had a watermark that I thought might confuse the pattern import.  Once that was done, I tweaked the design to make a seamless graph by removing the border and making some paths over the border and fixing a few bits for technical issues.  While I don't mind a 10-15 stitch float because I know I am going to line the resulting bag, I thought a 35 stitch float might be a bit long!  I actually have two different graphs, one of 40 charted rows, the other of 30.  This is due to me reaching the halfway point in my knitting and realising that my bag was going to be VERY deep if I followed the original pattern so I went back to my pattern and fiddled it a bit to make a shorter version.  Click on the chart to embiggen.


Now if you want to make this yourself, I would recommend two things- lots of stitch markers (I'm using one every ten stitches) and printing out the graph so you can cross off as you go.  I'm using the multi-pass technique described here at TECHknitting. Basically, on the first pass of a row, you knit all the stitches of one colour (eg green) and slip (purlwise to prevent stitches twisting) all the colours of the contrast colour (black).  After one round you go back with the OTHER colour and knit all the black stitches and slip all the green- so after two goes around you have done ONE row of knitting.  For this pattern, TWO rows of knitting are needed per charted row so that will mean four times around per charted row.  Confused yet?  Wait, there's more!

You also need to remember for knitting charts to start at the BOTTOM RIGHT of the chart and read from right to left.  Now this is not absolutely vital for this chart.  Your hero blogger managed to forget this crucial point and only realised several rows in.  Not wanting to have to frog the knitting, she shrugged and called it a mirror design feature.  But if you are doing a chart with letters, for instance, this important tip will prevent your letters and words being backwards.

The other important thing to be aware of is the yarn that is carried behind the knitting on the slipped stitches called floats.  In this pattern they are often very long in places- this is not recommended practise for clothing!  If this were a jumper or gloves your hands would get tangled in them constantly, they'd break and things would turn ugly very quickly.  There are ways to deal with this- there are techniques to fix them on long stretches (every 3-4 stitches is recommended in my reading) or they can be sewn into place after.  I'm not too worried in this project however as this is a bag and I intend to line it with material anyway to prevent things like pencils or knitting needles from poking out the side.  Just make sure to leave enough slack in the float so bag is not so tiny so as to be suitable for carrying only long skinny knitting needles!

Keep going until the end of the chart.  Knit one more row.  To finish the bag I followed the original  Creeping Jenny instructions from the eyelet row to the end.

Here's the results before blocking.  I'm hoping the weather will be nice tomorrow so I can block this baby and finish it off including a lining and eyelets.  See here for how I made a lining for the bag.
This side shows the middle of the pattern

This side shows the two ends of the pattern.  If you look very closely you may be able to see the slight stager from going from one round to the next.  However the difference is slight and should disappear with some careful blocking.

If you use the chart to make a bag or something else then please let me know!  I'd love to see what it looks like in different colours.  Feel free to use this chart and any other on this blog for your own purposes, just don't sell them.